
We began our partnership with HubSpot 10 years ago in 2009, and we’ve never looked back since. For those that aren’t familiar with the HubSpot, it is a marketing, sales, and service software that makes starting with inbound as easy as possible. HubSpot bring marketing, sales, and services together under the same umbrella to help your company grow.
Getting started with HubSpot can sometimes seem like a daunting task, so we are breaking down the process for you into multiple different steps. Let’s start with creating your buyer personas. A buyer persona is a generalized “buyer” that is specifically characterized to represent the diverse demands, goals, and detected behavior patterns among your customers. Creating buyer personas in your HubSpot account lets you target these customers as well as categorize your contacts accordingly.

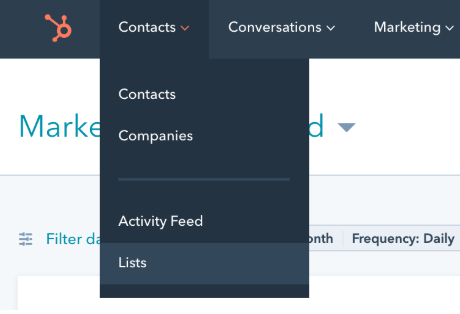
The first time you login to HubSpot, browse around the tabs included in the main menu bar. Starting on the left-hand side, locate the Contacts tab where you’ll find contacts and companies. This is also where you will be able to build lists and keep track of CRM information.
Next, we have the Conversations tab that includes your inbox and chatflows. Chatflows introduces team collaboration, chat, and bots all in one place. Learn more about utilizing Conversations to its best ability.
Moving on to the Marketing tab. This is where you can manage inbound activities, website pages, landing pages, forms, email marketing, social media, and more.
From the Sales tab you can manage forecasting, deals, tasks lists, meetings, and create playbooks.
Under the Service tab you can log support tickets within HubSpot as well as respond to customer conversations.
As you work your way to the far right of the main menu, the Automation tab brings you to where sales and marketing automation functionality takes place.
Last but not least, the Reports tab is where you can create custom reports and personalize your dashboard to your company’s preference.
Although there's lots we could cover here, in this particular post, we will focus on structure and building out your database and personas. Let's take a closer look at persona profiles, building lists, and workflows. HubSpot’s personas are defined as, “fictional, generalized characters that encompass the various needs, goals, and observed behavior patterns among your customers.”
The reason personas are important is because you have the ability to build targeted "smart" content and CTAs, making your content much more personalized.
Create a new persona or edit an existing persona:
- Go to Settings and locate the Properties field.
- Search in the property field for Persona.
- To edit a persona, click the name of the persona. To create a new persona, click Add another persona.
- In the right pane, enter information into the fields about your persona.
- Save.
Creating lists:
Once you have created as many buyer personas as your organization finds fit, start familiarizing yourself with the types of lists you can build.
There are two types of lists: active and static. Active lists consist of contacts that meet a certain dynamic criteria, joining the lists when they meet the criteria and leaving the lists when they no longer meet the criteria. Active lists will automatically update whereas static lists do not update. A static list is a group of contacts who meet a certain set of requirements at a certain time. Contacts are manually added and removed from static lists.
Create a new list:
- You will find lists under the contacts tab.
Create a new list:
- In the left panel, set the criteria in the segmentation category you've chosen.
- Once you've set your criteria, click Apply filter.
- Save.
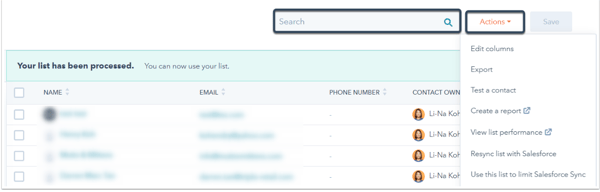
There are many other actions you can perform with your lists such as edit columns, export, test a contact, create a report, view list performance, etc.
Before we move on, let’s look at an example of an active list and a static list. Active lists pull in contacts as they enter the system and meet a criteria. For example, if someone opens an email, or someone becomes a lead, active lists grow as these criteria are met.
On the other hand, a static list is a point in time list. Static lists include, for example, records that are imported (like a trade show list) or lists where contacts are being added to it manually (such as a calling campaign list).
Lead scoring
After you have set up some lists, take a dive into lead scoring. Using predictive machine learning algorithms, HubSpot analyzes your customers and industry sets to determine the probability that your open contacts will close as customers within 90 days.
As a part of your HubSpot Marketing Hub Enterprise or Sales Hub Enterprise account, Likelihood to close and Contact priority properties allow you to analyze and segment your contacts based on this predictive lead scoring model. Predictive lead scoring is something that the system does automatically based on historical data whereas the HubSpot score is what you as an organization can set manually based on your own lead qualification specs. For example, you may want to prioritize a lead from a strategic account over others.
Predictive lead scoring
- To get there, click the settings icon in the main navigation bar.
- In the left sidebar menu, navigate to Properties.
- Search or browse in the Contact Information property group for Likelihood to close and Contact priority: *note: you need at least 100 contacts in your HubSpot account to see values for the Contact priority property.*
HubSpot defines likelihood to close as “a score that represents the percentage probability of a contact closing as a customer within the next 90 days based on standard contact properties and behavior.” For example, a contact with a close probability value of 56 has a 56% chance of closing as a customer within the next 90 days. Contact priority breaks down contacts into categories based on the likelihood to close score. This property can be used as a CRM filter to segment your best and/or worst leads. The Very High, High, Medium and Low categories will each contain 25% of your contacts based on the likelihood to close score, with the Very High category applying to the top 25% of scores. The Closed won category applies to contacts in the lifecycle stage Customer. Since the categories are relative groupings, the range of scores in each category may shift over time.
Manual lead scoring
Different companies have different approaches for assigning points to score their leads, but one of the most common ways is using data from the past leads to create the value system. Take a look at your contacts and determine what the contacts who became customers have in common. Make sure to take note of the attributes of your contacts who didn't become customers as well. Once you've looked at the historical data from both sides, decide which attributes should be weighted heavily based on how likely they are to imply if someone is a good fit for your product or not.
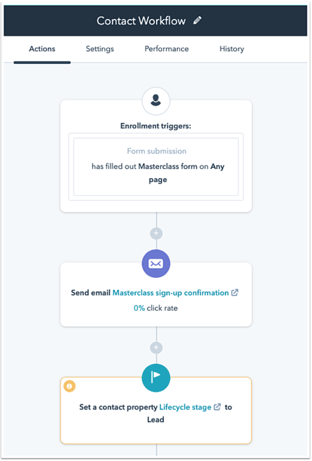
Workflows
The last HubSpot feature we will touch upon is workflows. There are contact-based workflows and there are nurture stream workflows. Workflows are set up to automate actions for multiple contacts at once.
Setting up a HubSpot Workflow
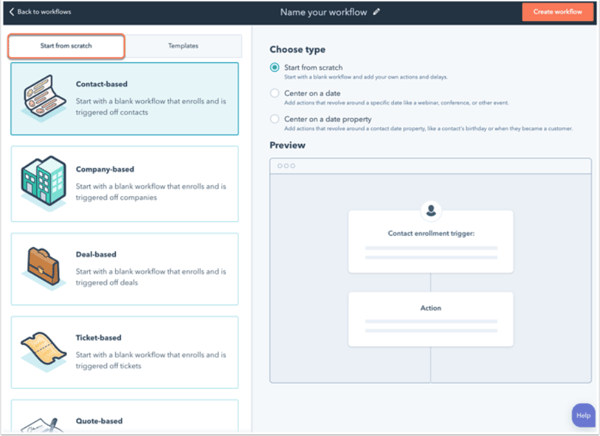
- Navigate to Automation > Workflows. Click Create workflow.
- Start from scratch: Beginning with a blank workflow, click the Start from scratch tab then select Contact-based as your workflow type. Under Choose type, select Start from scratch.
- Templates: to start with a default set of enrollment triggers and actions, click the Templates tab
- Start from scratch: Beginning with a blank workflow, click the Start from scratch tab then select Contact-based as your workflow type. Under Choose type, select Start from scratch.
- In the left panel, choose whether you want to start your workflow from scratch, or from a template. In the workflow editor, click Set enrollment triggers.
- Select if the workflow should be triggered Automatically or Manually.
- If you select Automatically, select your trigger criteria.
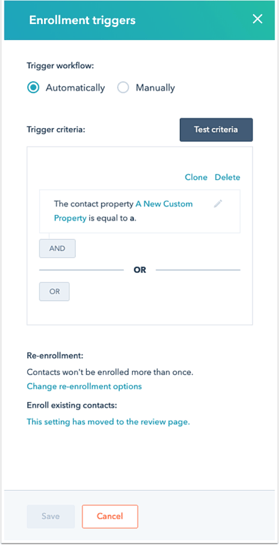
- Contacts will only be enrolled in a workflow the first time they meet the enrollment triggers.
- To enable re-enrollment, click Change re-enrollment options.
- Select the Allow contacts who meet the enrollment triggers to re-enroll when any one of the following occurs checkbox.
- Select the trigger(s) you want to use for re-enrollment.
- Click Done + Save
- Click the plus icon + to add a workflow action.
- Set up the details of the action, then click Save.
- If your workflow actions include sending a marketing email to enrolled contacts, you might want to set a workflow goal. Workflow goals measure engagement with your content and success of your workflow. Learn more about using goals in contact-based workflows.
- In the upper left, click goal Set goal.
- In the dialog box, select your goal criteria.
- When you're done, click Save.
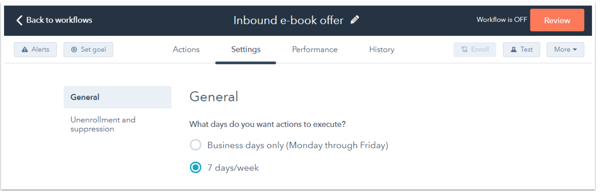
- Next, click the Settings tab. This is where you can manage your workflow settings, such as selecting which days of the week you want actions to execute, or adding a suppression list to the workflow.
- In the upper right, click Review.
- Choose if you want to enroll existing contacts:
- If you want to only enroll contacts that meet the enrollment triggers after the workflow is turned on, select "No, only enroll contacts which meet the trigger criteria after turning the workflow on." To enroll existing contacts that meet the enrollment triggers, select "Yes, enroll existing contacts which meet the trigger criteria as of now."
- To see a list of contacts that will be enrolled once the workflow is enabled, click Use lists to see these contacts.
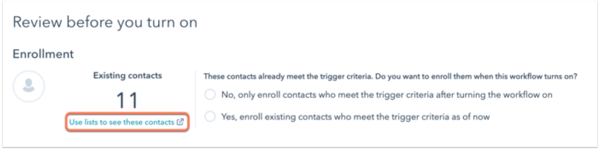
- Review the other workflow settings, then click Turn on.
------------------------------------------------------------------------------
Getting started with HubSpot - additional resources: